Who Am I?

My photo
I'm a designer of different types. I am a Metalsmithing major with a Photography and Graphic Design background. I also design haunted houses and props for America's Screampark, Frightworld. I play bass in a band called Thrown to the Wolves, too.

Thursday, April 29, 2010

Steampunk Gearrings

Well, several days ago I made a pair of Steampunk earrings for my wife. Then, with a little coaxing from Steve, I decided to mold one of them. So today I injected 30 waxes and sprewed them up for casting. It looks funky.


They will be cast in sterling silver, and will have a sterling post on the back. They will be for sale within the next 2 weeks or so. So pre-order now! You can pre-order it by going here!


Here is a similar pair in brass! Don't worry....Even when in brass, the stud on the back is sterling silver.


See you space cowboy....

Wednesday, April 28, 2010

Smoke with Edward

Just to start off, this is not a post about Twilight.

I received a commission from a friend of mine. The commission was to re-build an old smoking pipe that belonged to his family, but broke over time. The pipe was brass and wood, and was of traditionional Tibetan style. Here's a picture of what the pipe somewhat looked like before it broke:
I stuck with an industrial design, which is the general approach for me, but also speaks for the client's skills and talents in construction. The client named the pipe Edward, which is the title I will stick with. Here's some pictures of the finished pipe:


See you space cowboy....

Tuesday, April 27, 2010

Myconocle: The Eye of Psilocyborg

Well today I finished my monocle. It's of Steampunk design, and relates (in combination to the crown that is almost done) to a story that I wrote when I was younger. I'll go into that more when I complete the crown.

It's entitled Myconocle: The Eye of Psilocyborg

Myconicle
Myco from Greek mukes for fungus
Onicle from Latin oculus for eye

Psilocyborg
Psilo from psilocybin from Greek psilos for smooth and kube for head
Cyborg from combination of cybernetic organism

It's brass and copper with a leather strap and resin lense.

Here's some photos of it.


See you space cowboy....

Saturday, April 24, 2010

Taking a Break from Being Stoned to Switch to Shrooms

Well, because of recent medical problems, I have to take a short break from my stonework. So in 2 days I made this monicle. There will be a leather strap to make it wearable, and the dome will be etched and filled with red resin for a lense.

This peiece is called Myconicle: The Eye of Psilocyborg. It is a steampunk monicle with (suprise suprise) steampunk mushrooms. It is a follow up to my previous piece The Crown of the Psyilocyking (Pictures coming soon, I swear.)

So here's a snapshot of the monicle pre-etching and pre-leathering. Professional pictures of both pieces will be coming soon.


See you space cowboy....

Friday, April 23, 2010

Stoned: Day 4

Well, I was told today by the doctor that I could not do any strenuous activity. However, he said that filing and sanding should be fine. So though I was planning on taking the day off from stoneworking, I decided to give rasping and sanding a shot. It's a bit early in the piece's development, but progress is progress.


Here's the stats and a picture for the day's work:

Hours Worked: 2
Amount Subtracted: 2 lbs
Tool of Choice: Half round course rasp, 60 grit sandpaper
See you space cowboy....

Tuesday, April 20, 2010

Stoned: Day 3

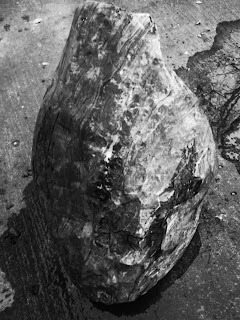
Oddly enough, I've been titling these posts as "Stoned," and today is 4:20. So I thought today would be a good day to do some sanding in order to take a good look at the grain and pattern of the stone. I took the picture, then put it into black and white so that everyone can see the grain a bit better. So here's the stats for the day, followed by the picture for today's work. You can actually really start to see the form coming out.


Hours Worked: 3
Amount Subtracted: Less than 5 lbs
Tool of Choice: Chisel and Mallet, with a little sandpaper


Is anyone actually reading this?

See you space cowboy....

Monday, April 19, 2010

Stoned: Day 2

More stonework today. This time, I have some progress pictures of me working. On the most part, in my safety gear. Eye protection and a leather apron are a must. The shards flying off from the chisel are very sharp and move quite quickly. The glove on my left hand is to help absorb the blow on the chisel. Here's the statistics of the day, followed by some pictures.

Hours Worked: 4
Amount Subtracted: 5 lbs
Tool of Choice: Chisel and Mallet


This is the picture of today's work.


These are two pictures of the stone before I worked on it. It shows some of the color and grain.


See you space cowboy....

Sunday, April 18, 2010

Stoned: Day 1

Well, I attacked this stone head-on and got a good deal of the shaping done. Statistics for the day:


Hours Worked: 3
Amount Subtracted: 5 lbs
Tool of Choice: Chisel and Mallet


Here's a picture of the work accomplished for the day.

See you space cowboy....

Saturday, April 17, 2010

Contemporary Shaman Mask of the Beast

Today I picked up my slab of stone from Sculpture Supply Canada in Toronto. This is one of the (if not the only) supply store in the greater Northest (Southeast for the Canadians) that offers the more exotic alabasters. The only other choices were really New Mexico and Colorodo, and the shipping for a 50 lbs chunk of stone is about $100, so not really in the range of my grant.

This piece is being done thanks to a small creativity grant from Buffalo State College's research foundation. So thanks to them, I can make a cool piece out of metal and stone.


This is an image of my original design for the Contemporary Shaman Mask of the Beast. This one is sculpted out of clay, and was to be cast in resin. However, I think the organic nature of the stone would be best fit for this design. It has a hinged lower jaw allowing the wearer to control it.


So there you have it. A lot of work ahead of me this week. But I will say: The folks over at Sculpture Supply Canada are great people. Very knowledgable and kind. So if you're ever in Toronto, they are a place to stop by and see. They have a bronze foundry, too.


See you space cowboy....

Tuesday, April 13, 2010

Key Changes

The mushroom veil will no longer be a veil. It will be a crown. Instead of a mistress, it will now be a king.

Saturday, April 10, 2010

Beads and Leather

Well, even with a disasterous shoulder and god-aweful concussion, I managed to get a bunch of work done on the mushroom veil. I sprewed the new mushrooms, but I won't bother with a picture of that. However, I re-processed the beads and embossed the leather.

The beads that make up the veil are red and black. The red beads, since they were commercial, were very bright and sparkly. So I processed them into new beads.


This is a before and after shot of the beads. The beads on the left are after, the right are before.


The beads next to the crown.


Here's how I made such a dramatic change to the beads. I'm puting it out there since I couldn't really find a description like this when I wanted to do it.

Step 1: The interior of the beads (where the chord or wire goes through) was covered in a metallic foil. This made the beads far too shiney and sparkly for my uses. So I heated up a small amount of pickle, and soked the beads for about an hour. I though that this would effect the surface of the beads (I was hoping for it), but it did not. However, it did remove the metal foil.

Step 2: Rinse about a dozen times to remove the foil from the water.

Step 3: I repeated steps 1 and 2 to ensure it was all clean.

Step 4: I used Armor Etch, which contains ammonium and sodium biflourides, to etch the surface of the glass beads. However, I knew that these two chemicals were water soluable, so I deluded the bath so that the beads would soak longer, making it easier to control. This made the surface of the beads far less glossy, and a little foggy and textured. The texture helped with the next step.

Step 5: I put the beads in a liquid-tight plastic jar. I used plastic instead of glass because the beads are also glass, and I wanted to minimalize the damage to the beads. I then, in a seperate container, oured a little bit of black acrylic paint. I then added a copper acrylic interference, which added copper powder to the black giving it a copper and metallic shine. I then let it solidify a little bit, then added it to the beads. I then shook it up in the jar, letting it coat evenly. I shook it for about 15 minutes, which allowed the paint to dry evenly on every surface to limit contact differences.

Step 6: Lay the beads out on a paper towel and put them under a light to heat them up a little.


So that's how I did it.


This is the embossed leather for the strap. It carries on the form of the crown, as well as the pattern.


See you space cowboy....

Show Last Night

The show last night was easily the best show in Thrown to the Wolves history. Without a doubt. 250+ people showed up for the show. Not a single one from the studio. But 250+ none the less. People really got into the music last night and the crowd was going crazy!

Wednesday, April 7, 2010

A Resource Post for Aric

Well, this post is for Aric to help him out with his Ocarina.

This company is called Songbird Ocarinas. Songbird has been around for years. How long I actually don't know, but I can say that when I was 12-15, I bought 4 ocarinas from them and they are all still solid. So they are a good source. Their site is also very useful in its inclusion of the history of the ocarina. Now, out of the four that I bought, they only still sell one of them. The first one that I bought. It was based on Link's ocarina in Zelda: Ocarina of Time (which I used to be able to play every ocarina song on ocarina...Dorky, I know). How I found this company was that Nintendo was doing a promotional thing where if you bought Link's sweet potato ocarina from this company, you got a free ocarina songbook with Zelda music in it. I have 3 or 4 ocarina songbooks laying around still. I had some friends that picked them up for me along the way.

If I could make a recommendation: Stick with a 4 hole rather than a 6 hole. The 6 hole ocarinas usually seem to be a craft object mainly for decoration. I can try to find mine if you'd like to take a look at how Link's is made or how my other ones are made, but they've been put away since I moved so they aren't just out in the open. But I'd gladly help out. I also made one in ceramics my second semester at my old college, but it isn't that great so it's not worth an examination. More or less, I just didn't give myself enough leeway for shrinkage so it didn't get the right notes. I now know that mistake. So if you need any help, feel free to ask.


See you space cowboy....

Tuesday, April 6, 2010

The Trees Get Their Revenge

Well, I will be temporarily slowing down in the studio for a week or two.
Saturday evening I was working in the back yard. I was embossing some leather, which seemed simple enough. A very large gust of wind swept through my back yard, knocking a large limb off of the oak tree above me. The limb crashed directly down on my shoulder, dislocating it and knocking me to the ground, giving me a concussion. Three doctors later, I have a lingering concussion with some possible lasting effects, as well as a level 2 AC sprain in my shoulder. So I must slow down.
The up side is: the embossment looks good.


See you space cowboy....

Friday, April 2, 2010

Exhibition then Show

So everyone should go to these two events. On April 9th, Tara Nahabetian and her husband Dennis Nahabetian will be having an opening reception for their exhibition at the Indigo Art Gallery in Allen Town, Buffalo. Right after, my band Thrown to the Wolves is having a show down the street at Mr. Goodbar on Elmwood Ave. So go from one to the other!

The opening reception is April 9 from 6-9PM at the Indigo Gallery at 74 Allen St, Buffalo NY. The show is at 1110 Elmwood Ave at Mr. Goodbar at 11PM. Here's the posters:


See you space cowboy....

Thursday, April 1, 2010

More Progress with Good Weather

Well since the weather was so beautiful today, I thought it would be the perfect chance to set up my outdoor bench on my back porch. So here it is:


It's really just set up for carving, so I worked on waxes today. I finished one half of the mushrooms for the crown.


They will be cast in brass. Tomorrow I will likely start and probably finish the other half.


See you space cowboy....

A Different Kind of All-Nighter

Well, I've been pulling pretty regular all-nighters recently. But last night was a bit different.

I spent the night rebuilding my band Thrown to the Wolves' photo gallery on the website throwntothewolves.com. Now it's all fancy and high-tech.

So go check it out, damnit!


See you space cowboy....