Who Am I?

My photo
I'm a designer of different types. I am a Metalsmithing major with a Photography and Graphic Design background. I also design haunted houses and props for America's Screampark, Frightworld. I play bass in a band called Thrown to the Wolves, too.

Tuesday, December 28, 2010

New Year = New Projects

With the encroaching new year, I have started planning and designing my next piece. This piece, however, is very different than anything I've worked on in the past. How so? Well, generally my pieces come from a concept and are developed around that concept...This piece is not. However, it will be more challenging than my previous pieces because it's not my standard method of working.

The company "Blizzard Entertainment" is doing a contest called Epic Weapon Replication. In this contest, artists pick a weapon in one of their games and make a real-life version of it. I have picked one called The Emerald Ripper.
I will be fabricating the handle and other metal parts from brass, and the blade (which is made from a solid emerald in the game) will be cast from resin.
This piece will be insanely challenging, but I think it will be entertaining to work on. Artists have a mere 2 weeks to complete it from January 1 to January 14. The time constraint is tough, but doable.
Wish me luck!
See you space cowboy....


Wednesday, December 15, 2010

Progress and Prizes

Well, here's another piece that I've been working on. This piece was made for the same Furniture Design class as the altar was made for. THe assignment was to make a serving tray, a clock, or a toy. While my Steampunk desires were shouting "DO A CLOCK!," I chose to make a toy. More specifically, a marionette. In the following photos, the controller above the puppet is not attached.


The body is carved from a block of soft maple. I used several different tools, but it all came down to hand working the wood. The left arm of the puppet is chased and repoussed copper, and the hand is fabricated brass. The legs as well as the crotch are brass and copper tubing and rod. The right eye is brass and copper, and the head is hand-carved soft maple.


More pictures will be coming soon. But I want people to toss me some name ideas for this piece. For some reason, I think Kenny will come up with something good, but I welcome all ideas. If you come up with something really cool, I will send you a prize! A piece of jewelry! Woohoo!

I will be honest: Pat is ahead right now with Avius. But naming this pieces doesn't have to be a name, it can be a phrase. So be creative! I'm tagging everyone I have the patience for tagging.

There will also be a whole slew of new pictures coming very soon.


See you space cowboy.....

Sunday, December 12, 2010

More Progress: Combining Two Disciplines

Well I've been working very hard on my new project. And today, I finished it! It is called "The Altar of the Oracle: Cleansing." It is an altar made from numerous types of wood, but primarily maple. It also features a massive amount of metal work. The interesting part about the metak work is the fact that a good chunck of it is functional and somewhat hidden.


Of course, to start explaining this piece, I should explain why I made it. It started as an assignment for my furniture design class where we had to choose an object and base a table design on said object. The object that I picked was a wooden incense burner. Oddly enough, the incense burner is not part of the finished table, though it was the influence for it. The idea for the design came from Aztec temples, which are very modular and geometric. Generally, I avoid geometric shapes, but I felt that when addressing the topic of religion, geometry and predictability worked well conceptually. The design of the altar evolved in a large way from its original design, but art is living.


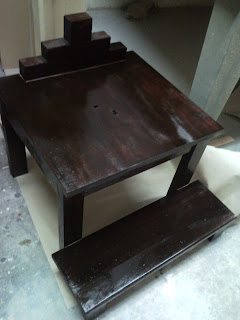
Here is a picture of the altar after the wood was cut, glued, and sanded.

As you can see, there is a kneeler in front of the altar. The altar itself is only about 3" tall total. The back of the altar resemples an Aztec temple quite literally.


Here it is after staining it with red mahogony. I chose this color because it was the same stain that was used for the woodwork in my childhood church of St. Matthew's in Syracuse.

As you can see, there are holes in the center of the table. So I suppose this would be a great opportunity to further explain why this altar is a little bit special.


Those holes serve as a plumbing connection. For what? Good question. For the fountain that had to be installed into the table. Since I pictured this table as a cleansing space, I wanted to play into this idea of ceremonial cleansing and preparation. In the center of the table, I decided to place a brass bowl. One that I sunk and raised by hand. Coming from the back of the altar, there would be a flow of water into the bowl. This played off of the common religious concept of purity and renewel.

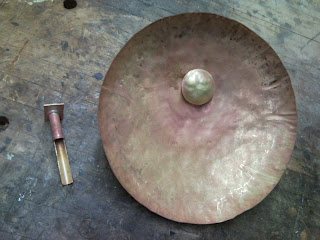
This is an image of the brass bowl and the faucet. Though we metalsmiths are trained well in clean-up of work, I opted into keeping, and in some cases forcing, the fire scale on the brass to pull a more aged look out of the metal.

But how would a person make this work? Well, I started out by gutting a small decorative fountain for its water pump. I then fabricated the housings for all of the components that would be used to run the fountain.


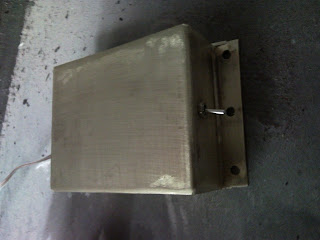
Here is an image of the pump motor housing. It has a water output line as well as a power output line.


This is an image of the power housing. It holds 4 AA batteries and has a power switch on it.


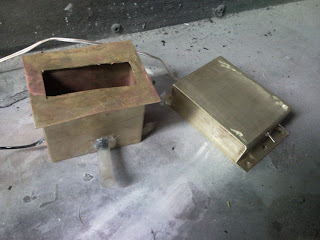
This is an image of the forward resevoir which is attached to the main water line. The resevoir attaches to the base of the bowl, and the water line goes back to the pump housing.


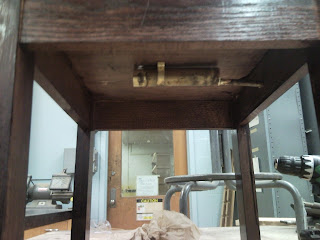
This piece was fabricated from brass and installed under the altar. Though it serves no similar function, the design is derived from that of an exhaust pipe.


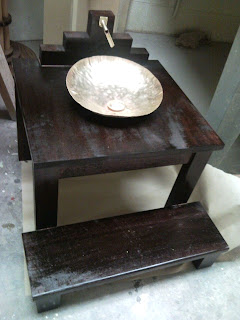
This is the altar completely assembled. Test runs were successful.


What other tricks are on this table? Well, 4 AA batteries is more power than the pump needed. It's also used to power a white LED in the base of the bowl which lights up the surface of the water, giving it a seemingly holy glow.


So I guess it was a successful semester!


See you space cowboy....

Saturday, December 4, 2010

Production Work and the Variations

Well I've been working on production work for the annual student sale. I have a few different pieces for sale, and I am now beginning to work on some special variations of some of the pieces. So here's some pictures.


This is a picture of my basic line for the sale. Just the pieces as-as. All cast in sterling silver.


Now here is one of the basic post Gearrings. Sterling Silver gears on a sterling post. These were adjusted to make a specialty variation on the same design.
The specialty design is called "Tick-Tock #1," and is a one-of-a-kind pair made of sterling silver and brass. More variations will be in the make this week. The only way to get a hold of one of these specialty pairs is to go to the student sale this upcoming week. So show up!
See you space cowboy....

Wednesday, November 10, 2010

Production Work

I haven't really posted much lately about things that I have been working on. I have been working on more than just production work, but these are a big part of what I've been up to.


These are some earrings that I have been producing for a bit now, but they've gone into further production.


This is a new piece. It's a Steampunk leaf pendant, which is a motif I have enjoyed greatly recently.


This is also a new piece, though some people have seen it already since I am currently wearing one in silver. I made this in honor of my final season at Frightworld as the manager of Return of the Mummy's curse. I gave a couple of them out to people, but I'm considering offering it for sale. I have yet to decide on it, though.


There will be more pictures soon of other work that I have been doing, but production stuff is important around holiday time.


See you space cowboy....

Wednesday, September 29, 2010

Reference Material

Well since no one in the Junior/Senior class seems to understand my topic, I decided to post some reference material here for you all to see.

Let me re-explain the concept. Read the whole thing. Seriously. Interuptions cause stupid statements.


The concept behind my theme for the semester is to create a dialogue between the viewer and the pieces. And by dialogue, I don't mean question and answer. Question: Is this functional? Answer: No. That is not a dialogue. That is a question and an answer. I intend to invoke all forms of questions through these tools that can't actually be answered, much like questions often posed by Anthropologists. The viewer can make a guess, but will never know for sure. I plan on creating a series of Anthropological tools that carry the basic form and appearance of functioning tools. However, the location of decoration and intensity of these decorations will cause the viewer to ask: What was this used for? Who used it and who was it meant for? Why was it made and done so in such an ornate fashion? A dialogue will be created through the use of our culture's concept on material value meaning that, at least to Western cultures, objects covered with time-consuming decoration are generally revered and reserved for particular uses. Think about it...Put yourselves in the shoes of an Archaeologist. You just dug up a hammer, much like yours, and a trowel, much like yours. The hammer has finely-detailed decoration on the head and chisel ends, and the trowel has decoration all over the face of the blade. Why would an Archaelogist create such an object? Was it really used? For what? This is my intent.


So here's some references.

A tripod pulley. I would like to make one that is hand cranked with fairly thin legs to particularly bring up the question of what it was used for.


Two different types of trowels. The marshalltown trowel and the planes trowel. I may combine the idea of a planes trowel with the idea of a scoop. I'll burn that trowel when I get there.


This is a sifter and it is the piece that particularly shows the purpose and meaning of this series. Trowels, hammers, and brushes can be used in many contexts. However, those tools (when combines with a sifter) specifically point at an Archaeological use of some kind.


Brush. Duh.


So there you go. It's not everything, but it's a start. Essentially, I'm playing a small trick using archaeology. Kind of a fractal idea, I suppose. An Archaeologist digging up the tools of an Archaeologist who was possibly digging up the tools of an archaeologist. Just somehow, these Archaeologists have questionable tools. Were Archaeologists prized to their culture? Were they ever used? Were they only used for royalty? Were Archaeologists royalty?


If you've read this, you'll see that the concept seems different than that described in class. It is not. It is the same concept and it would have been described and portrayed much better had my thoughts been allowed to be finished and had my sentences gone un-interupted. So, yeah....Good critique!


See you space cowboy....

Sunday, September 26, 2010

New Idea

I'm thinking of, rather than the current theme I have chosen, working on a new one that I feel will better expand my portfolio. I'm thinking about making a collection of Anthropological tools. I have already created one in the past which I call "The Body Poker" (photo coming soon). Recently, I was commissioned to make one for another Anthropologist, and I think it would be interesting to delve into this concept even further. I would like to make a collection of trowels, measuring devices, dirt sifters, bone pokers, pens, and maybe magnifying glasses. I would like to do this as I go, not necissarily one piece per assignment in class, but more or less make as many as I can think of and display what I have at critique.

See you space cowboy....

Saturday, September 25, 2010

Metals Meets Horror

Here's another mask under development at Frightworld: America's Screampark. The mask itself (like all of the masks at Frightworld) has been a great example of team effort. It was designed and created by Arick Szymecki, Andrew Lavin, and myself. When it comes to this particular mask, I really just did the metalwork on the back of it, and a little bit of touch-up coloring and washes.


Here's a picture of the metal buckles used for the mask.
When I originally made the brass buckles for the mask, they seemed far too pretty for a mask worn by a serial killer. I rebuilt them without my usual attention of detail, craftsmanship, and overall clean-up. I allowed firescale to build up, and when it wasn't enough, I re-torched the metal to get more. I used coarse files and sandpaper to mess up the surfaces, and went back in with Silvaloy solder to make globs on the metal. I then used an amonia wrap to patina the firescale on the blue/green side.
This is the mask that received the buckles.
Since the mask has a bit of a green hue, thanks to Andrew Lavin's paint job, and a brown/yellow hue, thanks to Arick Szymecki, the brass with a patina blends nicely. The nice thing about the patina is that it makes sense with the character of the mask. This mask is thought the be the mask of a basement-dwelling, canibalistic serial killer that basically lives in a stew of human remains. The patina itself is done with amonia, but can also be achieved through humanly fluids such as urine. Really, technique met theory and story in a way that is so subtle that it will likely remain unnoticed by guests. It is, however, a small detail that I can take pride in when addressing accuracy and thought.
See you space cowboy....

Saturday, September 11, 2010

Painting isn't THAT hard....

So I decided that I'd post a process update from work. For those of you that don't remember (or didn't know), I'm a designer at Frightworld: America's Screampark. We're actually rated as one of the top haunted houses in the country. In our building, we have 5 haunted houses, so it takes a lot of work to design them, build them, design and create costumes and characters, then hire the massive amount of employees to work there. Well, I've been working on a mask for one of our senior actors and I decided to release a bit of a teaser for this season.


Some of you already saw this mask when I worked on it in the studio. But here's another image of what you saw:

Well, it was my task to further detail this mask. So I did. I may be a 3D artist working in a tough medium like metal, but appearently painting isn't out of my grasp.


Here's a close-up of some of the detailed painting.

There you have it.
See you space cowboy....

Monday, July 19, 2010

Mask: Completed


Well the leather mask is done! Leather, copper, and fine silver. I still need to take good pictures of it, but I have some from my cell phone.
There you go. Good pictures coming soon.
See you space cowboy....

Wednesday, July 14, 2010

Production Line: Steampunk Bracelet

I started working on my first leather and metal bracelet for my Steampunk production line to be introduced for the first time at Dorian's Parlor in Philly on August 21. So here's some process shots of the leather working that I'm doing. It's called Wet Press Embossing in the leather industry.

Here's the design as I designed it on my computer.


These are two designs once printed on PNP Paper for etching the embossing plates. The white in the image will etch, the black will not.


I applied the PNP Paper with the design onto a sheet of copper.


I etched the design for about 3 hours in Ferric Chloride for a deep cut.


The receded areas will be where the leather it thickest.


I did a special conditioning process to the leather, then pressed it under lots of pressure for 6 hours. I just used plywood, acrylic, and C-Clamps for the pressing.


The leather came out pretty well. The discoloring comes from the clamped areas, and goes away with time.


The circle in the center will have a metal component in it. There will also possiblky be decorative riveting after I cut the cuff out.


I will take more pictures when the metal work is finished, but I still have to mold it and cast it.


See you space cowboy....

Thursday, June 24, 2010

More Done on the Mask

I finished the eye for the mask. I've gone through many designs, and actually fabricated three different eyes for this mask. But I think I finally found the one that I like. It still features the partial filigree lense and the filigree climbing the eye. However, now it repeats the copper tubes that appear on the forehead.

I anticipate completion within the next week or so. I need to take a few days off since we're moving this weekend, so hopefully I can finish it in its entirety tomorrow.


See you space cowboy....

Saturday, June 19, 2010

What's Left?

Well, there's not way too much left on the leather mask. After learning and getting comfortable with filigree, the rest is all a breeze.

But there's some basic fabrication left.

Here are some sketches of the eye. There's three


The eye will have a hollow-formed piece coming off of it. Actually, the hollow form is built. It's just not on yet. As seen in the two smaller sketches, the filigree will climb, like the vines it resembles, from the eye to the external portion.

Here's a close-up:


As can be seen in the close-up, there is really no lense to this piece. The filigree covers the viewing area, causing a filigree screen. I'm trying to go reasonably traditional as far as technique goes on this piece, so acrylic or resin lenses won't really do.

The filigree will also climb on the inside of the eye.

Now, a HUGE problem I have whenever I work on a mask is the method of adornment. It seems that I always just assume that straps will be used, but that's not necissarily the case. Since this piece was designed based on Cirque du Soleil masks, I decided to go with a masquerade technique and use a handle. Much like The Contemporary Shaman Mask of the Healer. However, this time around it will transition much better with the mask and the concept of the piece. Take a look.


Like the forehead of the mask, three tubes will extend from the right side of the mask (I am a righty, after all) and lead to a larger copper tube. The connections will look very industrial, as is the purpose of the copper in the mask. Going down the handle, there will be filigree climbing. It will then extend into the mask. There's some other ideas that I'm tossing around, but I don't really know. I was thinking of using a chain to connect a bracelet to the handle. The bracelet would clasp on the wearer, and would incorporate both the copper and the filigree.


This piece in idea and design has greatly evolved. I decided to change the perspective name (like I usually do half a dozen times) and call it the Contemporary Shaman Mask of the Apocolypse. What I find interesting is that, from the side, the mask is starting to look like an industrial landscape that has been taken over by silver vines. I'm running with that.


See you space cowboy....

Friday, June 18, 2010

Progress on the Mask

Well I've been working very hard on the leather mask. The hardest part has been the fine silver filigree. Yes, filigree. True filigree, too. No solder here! So here's some pictures from the past few days of work. Please keep something in mind when viewing these photos: The leather is not fully finished, and neither is ANY of the metal. Polishing, sanding, shining, and patinas still need to be applied.


Day 1:
This is the first day of work on the mask. I formed the leather using an old European traditional method (I may go into that in a later post...Or I may be greedy and keep it a secret. Who knows?)


Day 2:

This is day two of the work on the mask. I started working on the fine silver filigree, and figuring out its connections to the mask. The filigree is held on by fine silver nuts and bolts that go through part of the filigree. It just takes a little planning ahead.


Day 3:
This is the third day of work. I added some more filigree and applied some copper tubing with filigree on it for the purpose of the industrial vs natural message of the mask.


Day 4:
On day four of the work on this mask, I attacked the cyborg eye. This has been the part I have been fearing the most. Soldering filigree to small copper tubes is fairly simple, but large pieces of copper with overflowing filigree is a different animal all together.


After a several hour nap, I then went back to work, with more filigree coming off of the eye to the top. More filigree will be done within the next day or two around the eye.


See you space cowboy....